Plants vs. Zombies 100% Speedrun Guide
NOTE: THIS IS NO LONGER THE OPTIMAL ROUTE, Aaronthewinner came up with a better route that takes the Cob Cannon earlier, however this guide is still useful for newer runners to this category or for players who are not that experienced with Cob Cannon strats
this is my rather long, but in-depth guide on speedrunning the 100% category in plants vs. zombies, where the goal is to get the golden sunflower trophy as fast as possible
before starting i would highly advise having at least one completed run in every main category so that you have some experience on how to beat each level quickly. at the very least you should practise all of the levels to some degree. this run can be tough on your body so making sure that you know what to do will help reduce errors and allow you to more or less "autopilot" most of the run.
Things to know First
there are two versions of the game that are viable for 100%, the first is the Non-GOTY edition, specifically version 1.2.0.1065 or “non-GOTY patched”. this version has the original dancer zombie which helps out a lot in the survivals and it fixed a bug in the unpatched Non-GOTY version whereby cob cannons on the roof would not land where you target them. since the last level of the run requires the use of cob cannons and is on roof, that’s a huge issue for us.
the other version of the game to run on is the version sold on steam. it does NOT have the original dancer zombie or cob cannon problem, but it does have a useful glitch that allows you to farm money if you so wish. money farming is great if you are not confident you can beat the game with only 9 slots and limited plants, but you lose about 7-10 minutes in the process and you don’t make all that time back with 10 slots. so for the purposes of this guide we will not be money farming but here’s WarMech’s guide on how to do it if you want to try it out.
if you want to practise with 9 slots, you can make a savefile for that via the PvZToolkit (any version) or Ravidog’s Save File Editor (steam version).
make sure you have food and water nearby, do not deprive yourself of your biological needs just for a speedrun.
there are two (2) bathroom breaks that you can safely use in this category, the main one is on Column Like You See ‘Em as all you have to do is plant the initial plants and then you can go. the other one is on any of the survival levels except for Hard Roof, but this only applies as long as you have everything set up. you may not need to use either of them but it’s unlikely.
money is extremely important in this category, make sure you grab every coin you can.
throughout this guide you will see I have made layouts for most of the mini-games and survivals, but do note that they are merely guides, they are the most ideal sort of setups and they are not the rule. you might have it where something in one of the layouts won’t work because of a certain zombie spawn or something else, but just take the layout guides as exactly that - guides. each layout was created using this website.
finally, i will be explaining the survival and mini-game strats, but for adventure mode i will be assuming you have already completed a run and/or know the strats anyway, so I won’t be explaining those here otherwise this guide would be twice as long as it already is. i will also not be explaining the puzzle strats as they are very hard to describe and it's best that you either practise them yourself or watch someone else do them to get an idea for what you should do. the goal of the puzzles is to not reset so safer strategies are usually the best for a marathon run.
Adventure Mode Route
- play until 3-2 at which point you will have unlocked the first 3 mini-games. switch over to them by clicking on the main menu button in the top-right during the plant unlock screen instead of holding enter.
- complete slot machine and wall-nut bowling. if you want to money farm, do it on slot machine.
- go back to adventure mode. it's your choice whether or not you want pool cleaners, they lose $1000 and aren't needed but they make some of the mini-games much safer.
- buy the rake on 3-6 and 3-9. it is your choice whether or not you want to buy it for 4-2 and 4-5, though i highly recommend it for the latter
- (optional) buy the rake on 4-6, after beating the level you will have unlocked the first 3 vasebreaker and i, zombie puzzles. you can choose to detour here and complete these puzzles. it loses a little bit of time but it does guarantee that you get the roof cleaners and gloom-shroom for the roof levels. however the odds of you not being able to afford the gloom shroom are extremely low so most runners opt to not to this detour. if you do want to do it i would highly recommend buying the rake for third vase, not only does it make the level easier but it also gives you the rake for 4-7 and 4-8 (assuming that you don't reset on third vase).
- assuming you do not do the puzzles detour, buy the rake on 4-9, 5-2, 5-5 and 5-8. on 5-2 buy the roof cleaners and on 5-4 buy the gloom shroom
Puzzle Mode Route
after beating the adventure mode, switch over to the puzzles as it gives you money without having to buy anything else and it gets a short, but difficult part of the run out of the way.
as mentioned earlier, the main goal of this section is to get through every puzzle without resetting. you can choose to buy the rake for the vasebreaker levels but you don't really need them
if you’re struggling with the puzzles section, make sure to watch WarMech’s All Puzzles Guide and/or Bubla’s I, Zombie Guide.
Start of Mini-games
after completing the puzzles, switch over to the mini-games and complete them in this order:
| 1. it's raining seeds | buy the rake before starting |
| 2. beghouled | |
| 3. invisi-ghoul | pool cleaners can be especially useful here, but not required |
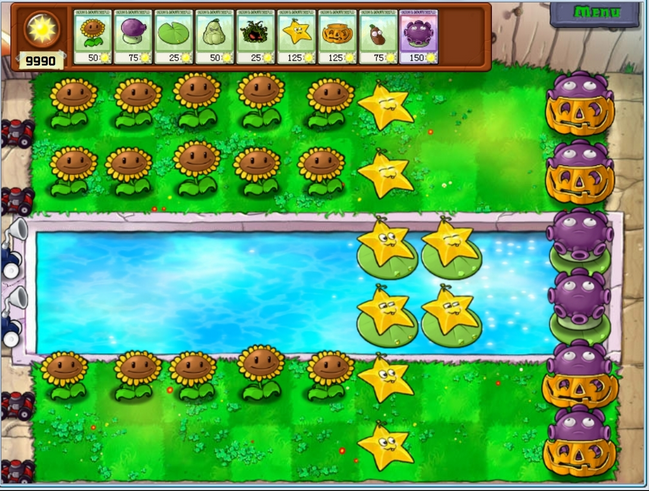
| 4. seeing stars | plant 13 sunflowers first, hold off zombies with puff-shrooms |
| 5. zombiquarium | 9 snorkels |
| 6. beghould twist | |
| 7. portal combat | it's best to play this level safe, so get cacti up ASAP and hold onto at least one cherry bomb for an emergency |
| 8. column like you see 'em | bathroom break here if required |
Zombie Nimble Zombie Quick
before starting make sure you buy 9 seed slots and the rake. for the plant selection, if you don’t have the pool cleaners i recommend taking tangle kelp, otherwise it’s usually better to take the potato mine due to the first flag being the biggest determinant factor of your final time in this level.
you should focus on getting the first two glooms up on rows 2 and 5. use starfruit to kill stray zombies. starfruit will also help deal with dolphins if you take the potato mine. glooms on rows 3 and 4 should be your next priority and then the ones on 1 and 6.
be aware that you do not have access to imitator pumpkin, so keep a sharp eye on your pumpkin’s health and repair accordingly. alternatively if you’re not comfortable with column 9 glooms, place them on column 8 instead, but be aware that this is considerably slower on average.
Whack A Zombie
you thought you were done with fast clicking? think again!
you can do the lawnmower strat here if you so wish, but it saves only a fraction of a second at most and gives you less money so i would avoid it.
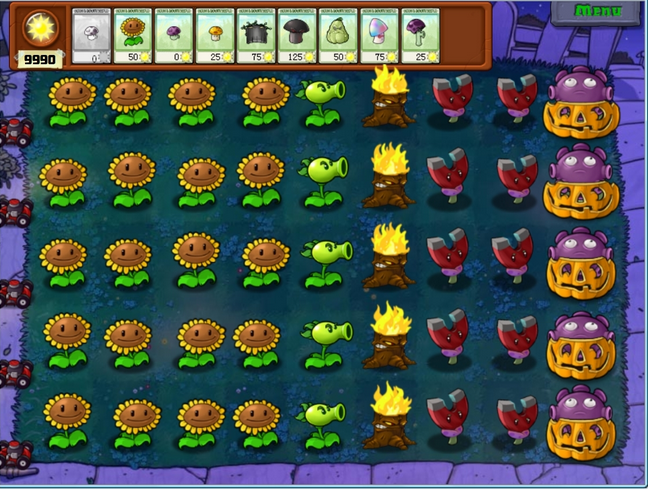
Last Stand: Fire-Pea Strat
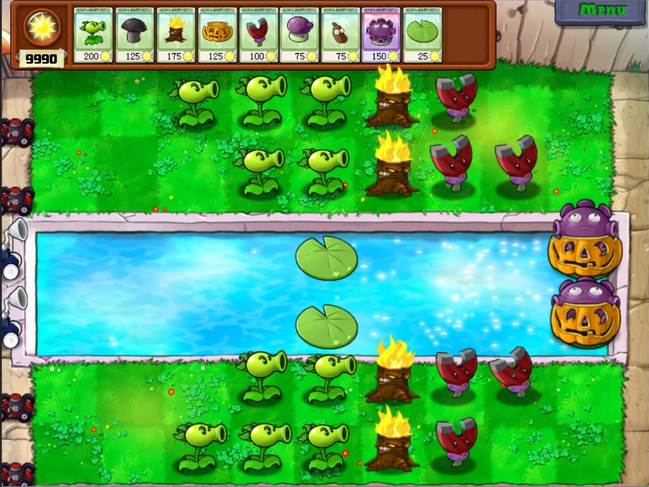
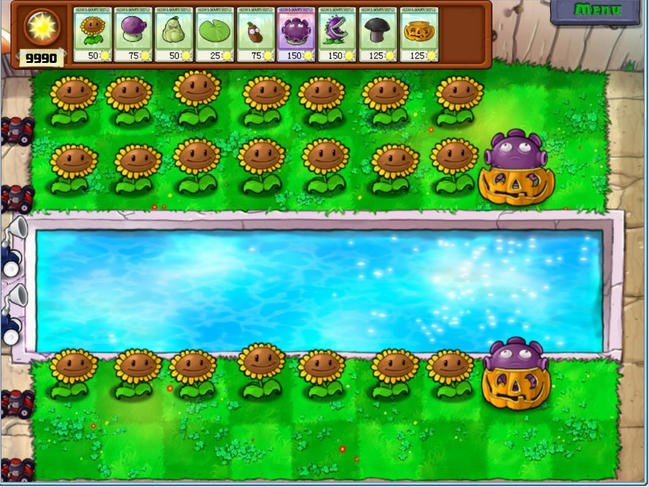
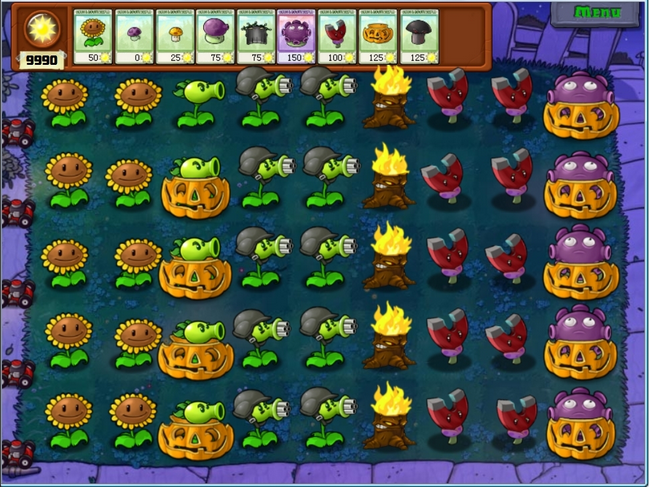
take the selected plants and use this layout. for actually starting the level you can play it as safe or as aggressive as you want. the fastest way would be to just start the level without planting anything, but that’s risky. for a safer option you can plant the glooms up first and then start the level.
for the first flag you only need to plant 4 Magnets, for the upcoming flags you’ll want to plant two more as shown in the setup.
the lily pads shown here are to prevent stray pool zombies from getting through. you want to use a doom-shroom on every huge wave to clear everything. this strat is not 100% safe, but a death is very unlikely and you will get a time under 7 minutes easily.
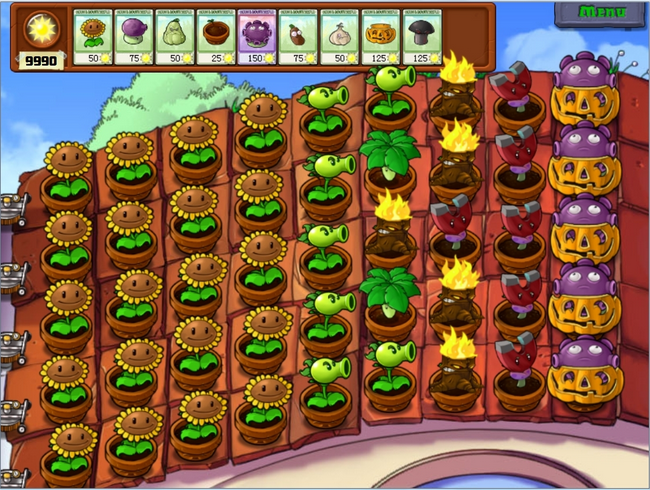
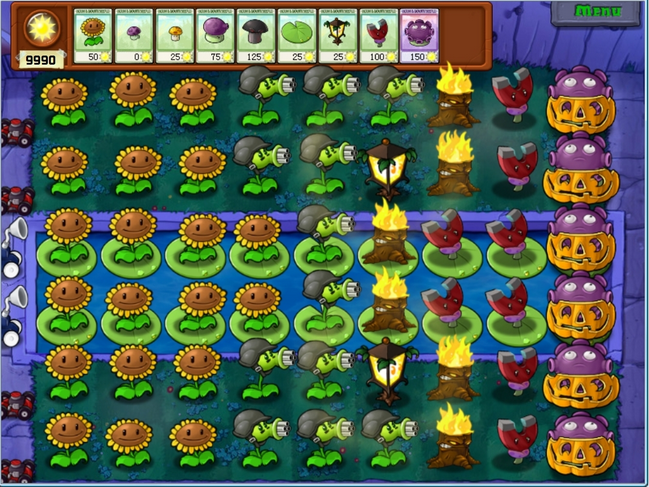
Last Stand: Cob Cannon Strat
if you don’t want to do the fire-pea strat, you can use this one instead. YOU CAN ONLY DO THIS STRAT IF YOU MAKE IT THE LAST LEVEL IN THE RUN AS WE DO NOT GET THE COB CANNON UNTIL NEAR THE END OF THE RUN
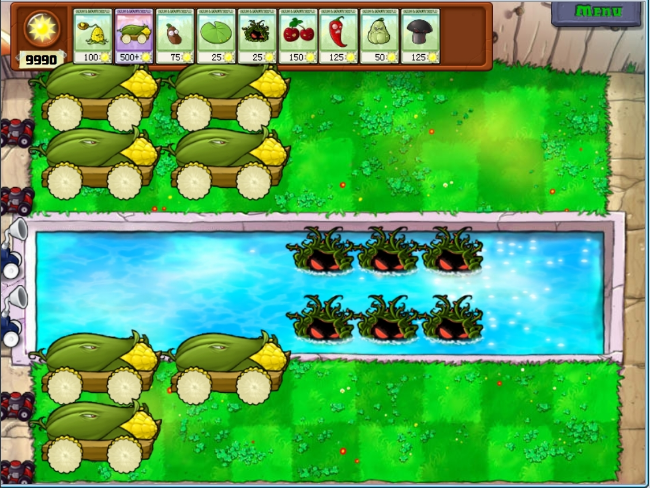
start by planting 5 cob cannons, then plant the 6th one as you’re doing the first flag. use tangle kelp to deal with pool zombies and instant-use plants to deal with the huge waves and any zombies that get through. the cobs recharge instantly between flags so you can also fire all of them during the huge waves.
this strat is considerably safer, but most runners will find it slower on average.
Zombotany
take the selected plants.
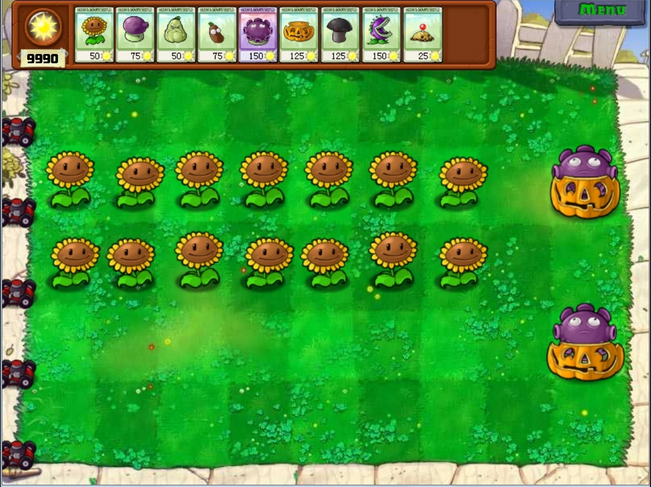
plant the first row of sunflowers in row 3 and depending on where the next Zombie spawns you’ll either keep planting sunflowers in row 2 or 4, plant the first gloom with a pumpkin as soon as you’re able to.
once you’ve completed the first flag plant a doom shroom on row 3 column 8 and plant a sunflower in front of it to protect it. squash and chomper all wall-nut Zombies and detonate the doom on wave 19, then plant another doom on row 3 column 9 and detonate it on the final wave.
Zombotany 2
buy the rake and take the selected plants.
plant the first row of sunflowers either row 1 or 2, let go of all zombies in the bottom two rows and plant the first gloom in the top row as soon as you can.
squash and chomper all wall-nut, tall-nut and jalapeno zombies. if a squash zombie appears make sure to plant something cheap in front of it to prevent it from getting past or squashing your glooms.
after flag 1, plant a doom shroom in column 8 in the pool and detonate it on the 19th wave, do the same on flag 2 on the 29th wave.
on the final wave, plant a doom shroom in column 9 of the pool and detonate it.
Wall-Nut Bowling 2
you can use conveyor-belt manipulation to give yourself more explode-o-nuts and giant wall-nuts.
dancer zombies, regardlesss of what version you run on are the worst zombies you can get here as they block access to most other groups of zombies
however the level is fairly straight-forward, just aim for the area of zombies with the highest number of hit-points. you can use lawnmowers at the end to clear some rows while you focus on the rest.
Zen Garden, Survivals Route and General Advice
after wall-nut bowling 2 you will want to go to the zen garden and sell any and all plants you have there. over the course of the puzzles and mini-games you should’ve been able to collect a few diamonds and sprouts. the more you have the quicker you can buy the plants you need for the remainder of the run.
the plant you want to buy next is the imitator which costs $30,000, don’t buy any other plants at this point.
the normal survival route is as follows: day, pool, fog, night, roof. we can get away without the imitator on day, pool and technically fog, but night and roof are considerably slower/harder without the imitator. of course you don’t have to use this specific order if you don’t want to.
while I do go in-depth on what to do for each individual survival, i mostly talk about the first flag, what to take for upcoming flags and how to deal with certain scenarios occurring that could cause issues. the problem is that there’s simply too much to talk about when it comes to survivals so a “general guide” is never going to cover everything and really a lot of it comes down to experience and adaptation.
if you’re new or inexperienced with survivals, you might be wondering what you need to focus on in order to maximize sun efficiency and damage output.
so as a general rule of thumb, this is the order of things to focus on: Gloom-Shrooms > Repeaters/Sunflowers > Torchwoods (If magnets are required and you don’t already have them planted, they should be your focus before planting Repeaters)
glooms are your quickest means of dealing damage to the zombies so you want to make sure you get out all of them as fast as you can, but while on cooldown you’re still going to need to further increase your damage output, which is where repeaters + torchwoods are great.
for survival: fog (normal) flag 2, the order of things to focus on actually changes to Sunflower > Gloom-Shrooms > Repeaters (same thing about magnets). after flag 2 the order changes to the standard one.
for survival: roof (hard), the order on what to focus on changes again as we use cob cannon strats. though really there’s not much to talk about in terms of an order as it’s essentially “plant cob cannons ASAP, use up doom shrooms when needed, maintain glooms for as long as possible and keep planting sunflowers” and while planting cob cannons is by far the most important thing to do, the other 3 things can be done simultaneously.
again all of this is somewhat hard to explain in a concise manner as there’s a lot to talk about and it’s all about experience, but this is the most basic way i can put it.
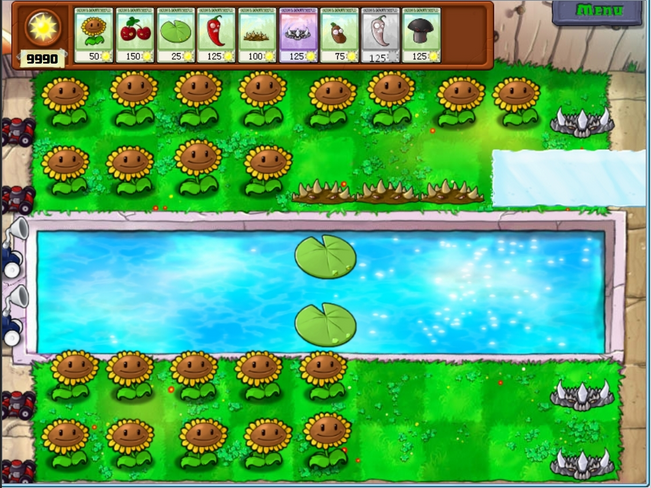
Survival: Day (Normal)
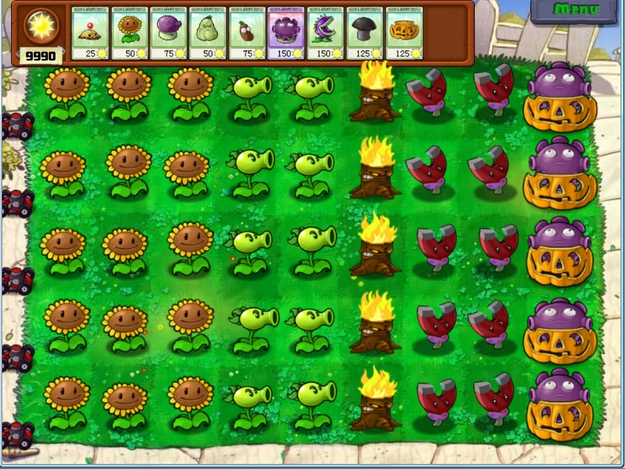
for the first flag of day, take the selected plants and buy the rake. build up two rows of 6 sunflowers, starting from the 3rd row and have the second one be in either row 2 or 4 depending on where the 2nd-wave zombie spawns. place a gloom in either row 2 or 4 and build up from there. use potato mines and squashes to deal with zombies that won’t get hit by the gloom and plant a second one up as soon as you can.
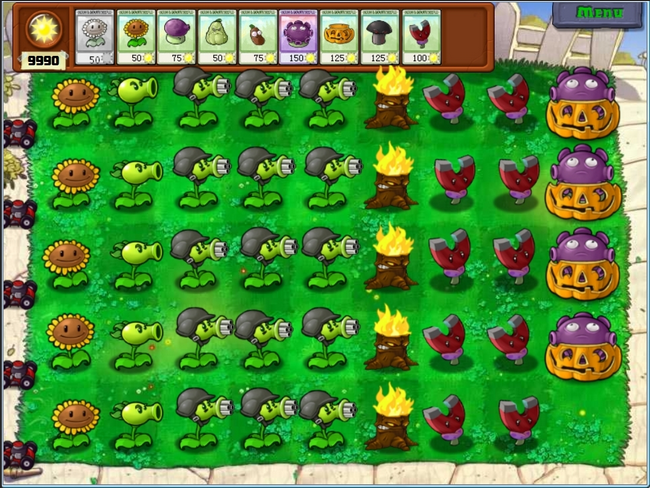
after the first flag you’ll want to take fume-shroom, gloom-shroom, coffee bean, repeater, torchwood, pumpkin, doom shroom and if the situation calls for it you’ll also need magnet shrooms. your 9th seed can be whatever you want, i usually go for the jalapeno or squash but if you need more sunflowers then take that. if you have the imitator your 9th seed could also be imitator pumpkin
you’ll want to get a setup that looks like the one above. keeping your glooms up is very important so if you lose one you must replant it.
make sure to use a doom every huge wave. your biggest timeloss from this level will come down to how many coneheads and dancer zombies you get, as is the case for basically every survival.
Survival: Pool (Normal)
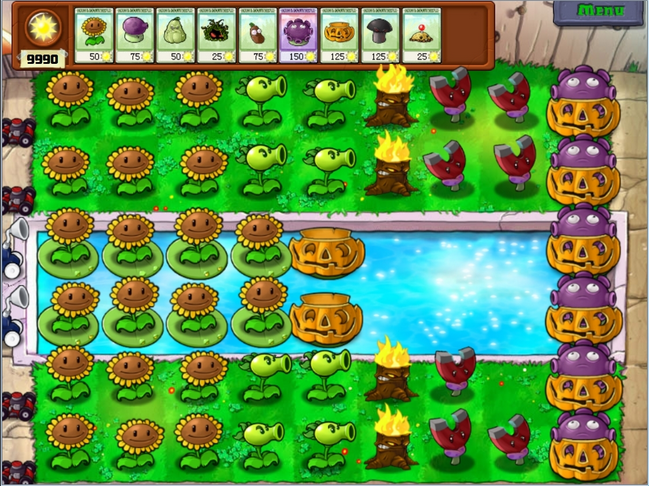
for the first flag of pool, take the selected plants. you’ll need to plant four rows of 6 Sunflowers and have two glooms up (on rows 2 and 5) ideally by the end of the first flag. it should be noted that if you have the imitator, it’s better to take it as an additional sunflower instead of the potato mine because sun production on this level without it can be considerably slower than desired.
taking tangle kelp on the first flag is not necessary - you can use the lily pad instead but tangle kelp helps out if you get coneheads in the pool. the first doom shroom you use should be in column 7 in row 2 or 5 to clear the huge wave.
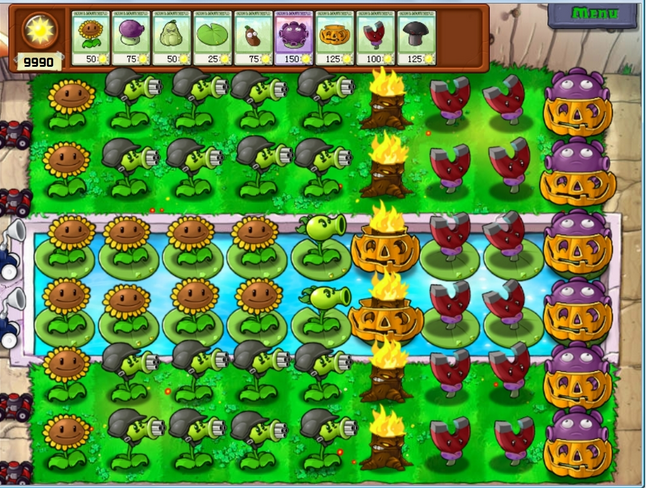
after the first flag, you will 99% of the time need more sunflowers so i advise taking sunflower, fume-shroom, gloom-shroom, lily pad, coffee bean, pumpkin, doom shroom and squash. your 9th seed slot can be repeater or magnet-shroom depending on the spawns. alternatively you can forget about the squash and take repeater/torchwood, but i would only recommend this if you get a spawn without coneheads and bucketheads.
the above setup is what you should aim for after flag 1.
you should aim to have lily pads in column 5 of the pool at all times as pool zombies can spawn there and if they get past then your dooms will not hit them.
make sure to use a doom shroom on every huge wave. all Dooms should be planted in column 7 or 8 of the pool. you can then plant a column 9 doom for the very last wave. if you want you can place more magnets in the pool instead of leaving that space empty.
Survival: Fog (Normal)
for the first flag of fog take the selected plants, though if you have imitator you should take that as an additional puff shroom instead of the squash. you’ll need to plant 4 columns of sun shrooms/sunflowers. the goal of this first flag is to clear it with just puff shrooms and instant-use plants.
after the first flag you’ll want to take puff shroom, imitator puff (if you have it) sunflower, fume-shroom, gloom-shroom, pumpkin, doom shroom, lily pad and depending on the spawn either squash or magnet (if the spawn is just newspaper and regular zombies, taking the repeater is also an option)
the above setup is what you should aim for after flag 1. your priority should be to get your glooms up and keep them there. don’t worry if you can’t get this exact setup, the first flag is done with just puff shrooms so you have less time to plant glooms, repeaters and whatnot.
the advice for lily pad placement and doom shroom usage that was given for pool also applies here.
Survival: Roof (Normal)
for the first flag of roof, take the selected plants and make sure future is enabled. also buy the rake. let the first zombie die to the rake and the next 2 die to a squash on column 3, then set up a gloom in column 9 row 3. redirect zombies to the gloom with garlic and get the rest of your sunflowers up. the first doom shroom should be placed in column 7 row 3.
after the first flag you’ll want to take flower pot, fume-shroom, gloom-shroom, doom-shroom, coffee bean, pumpkin, umbrella leaf and squash. for the 9th slot take either repeater or magnet-shroom depending on the spawn.
the above setup is what you should aim for after flag 1. you may not be able to get as many magnets up because of craters so sometimes it’s best to sacrifice torchwoods for them instead.
make sure to use a doom shroom on every wave. this level can be tough without imitator because you will likely need to take imitator pumpkin to protect your glooms - there’s simply not enough space or time to get up repeaters quickly.
Survival: Night (Normal)
by this point you should have enough money for the imitator, if not then you got seriously unlucky.
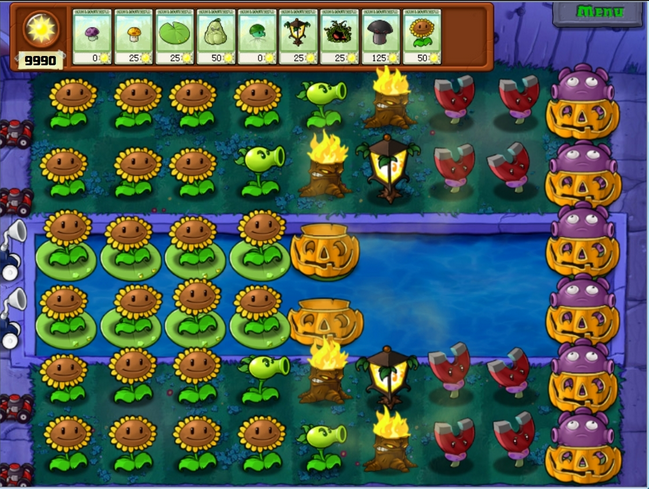
your first seed selection only needs the first 7 plants in the list, the remaining 2 plants don’t matter that much but i recommend hypno shroom, scaredy shroom or fume shroom as they’re cheap and quick to select. fume can be planted at the very end of the flag to prepare for the gloom shroom on the next flag.
for the first flag, place your sunflowers i column 4 and the sun shrooms behind, fill up the rest of the lawn with puff shrooms.
for the second flag, take fume-shroom, gloom-shroom, puff shroom, imitator puff shroom, garlic, grave buster, pumpkin, squash and any other plant. i recommend repeater or magnet shroom. place a gloom in column 9 row 3 and use garlic to redirect zombies to it. keep building up glooms and using puffs.
for the third flag onwards, build up repeaters, magnets and your final glooms.
make sure to use a doom shroom on every wave. at the end of each flag a grave will spawn, but only on empty spaces on the lawn, if all spots are used a grave will appear where one of your plants are and that can mean you lose a gloom. to avoid this, keep 1 spot on the lawn empty before the huge wave.
Final Mini-Games
after completing the normal survivals, it’s time to return to mini-games since we now have the imitator. before you do though make sure to sell any plants in your zen garden if you got more. by this point we should have enough money to buy the spikerock which will be required to complete bobsled bonanza, if you don’t have enough then do survival: night (hard) before bobsled.
Pogo Party
the strat for this level is the similar to the one in all minigames but without jalapeno, it’s riskier though so sometimes it’s best to let go of a 2nd pogo zombie for safety. refer to the minigames guide for more detail.
essentially, on the first flag you want to set up a wall of squashes on column 8 to kill the pogos and then get up column 8 glooms, back them up with split peas and continue to plant squashes to keep pogos from getting through.
make sure to practise this mini-game if you’re unfamiliar with it.
if you’re not comfortable with this strategy, you can do Pogo Party after wall-nut bowling 2, but you won’t have imitator. instead take the jalapeno. the difference in the strats is that rather than focusing on squashing zombies early, you prepare sun and get your glooms up ASAP and then plant split peas. jalapeno is used as a backup in case something gets past. the time can be slower anywhere from 10 to 30 seconds.
Dr. Zomboss's Revenge
this mini-game has a lot of details to it so refer to the all minigames guide if you're unsure. for the purposes of 100% though we want to avoid 'hell cycle' which is what happens when zomboss's damage is almost exactly at 50%. if you enter hell cycle, zomboss will continuously throw down bungees and camper vans seemingly infinitely. you can get lucky and have it only last a few seconds or get very unlucky and have it last 10+ minutes. to avoid 'hell cycle' you should look to beat zomboss in 4 cycles:
- on the first cycle, try to deal 5 jalapenos worth of damage
- for the second cycle, there should be no bungee zombies. for this cycle you should try to deal a LOT of damage to zomboss but not so much that it goes above 50%
- the third cycle should start with bungees, when zomboss lowers his head, go all-out
- the fourth cycle should start with zomboss throwing a camper van down. just like the third cycle, you should look to deal as MUCH damage as possible to zomboss here.
if you weren't able to beat zomboss in 4 cycles, you should be able to do it in 5 easily unless you got extremely unlucky. this level is deceptively hard so don't beat yourself up too much if it's slower than you'd like.
Bobsled Bonanza
this is the last mini-game in the run unless you chose to end on last stand. before starting this level make sure to buy the spikerock. remember that if you can't afford it, go to survival: night (hard) first.
much like zomboss's revenge, this level has a lot of detail to it so i'd recommend looking up the mini-games guide.
to give a brief summary of the strat though, essentially you want to kill all ice-trails but leave one out as shown above to keep zombonis and bobsled teams spawning. use spikerocks on the remaining rows. make sure to also have doom shrooms prepped in the pool for huge waves and use the cherry bomb on bobsleds on every 9th wave.
Hard Survivals Route and General Strategies
after beating bobsled bonanza it’s time to move onto the final hour of the run, the hard survivals
the order of to complete them in is as follows: night, fog, day, pool, roof. though you can do them in any order you want as long as night is first and roof is last. night is the easiest since there is no zomboni. roof is the hardest and requires the cob cannon which you are unlikely to be able to afford until the very end of the run.
before starting the hard survivals make sure you go to your zen garden and sell any sprouts you have. the plants we need to be able to get are the gatling pea and the cob cannon. you can also buy the twin sunflower and plant first-aid, but it’s not necessary. prioritize getting gatling first as it is used on 4 out of the 5 survivals.
there’s some important things to note with hard survivals that will give you a considerable easier time if you take them in.
firstly, sun matters a lot more here than it does in the other levels. due to how expensive the setups are you must aim to get around 1000 sun before the 2nd flag ends on most of the remaining levels. as a general rule: let your glooms do the work and keep planting sunflowers.
second of all: your biggest potential timeloss in these survivals mostly come down to the first 2 flags and how many gargs you get. as far as i know it’s impossible for a garg wave to appear on flags 3-4, but after that they can appear as often as they want. also imps are nasty things that can get through your defenses surprisingly well, if you’re worried about them you can always plant repeaters on column 1. for killing gargs specifically, your gatling peas should be able to deal 50% damage to them pretty quickly, after that you only really need an instant like a squash to fully kill them. but in my experience this is only needed on wave 9 unless you get absolutely bombarded with them.
finally, hard survivals in particular is all about adaptation. even if on the layouts i show it says to have 10 magnets up, you shouldn’t really be doing that if you’re not expecting bucketheads, instead focus on things like gatling peas or sun production.
Survival: Night (Hard)
for the first flag, take the selected plants and buy the rake. on the first two flags you want to use puff shrooms until you can get your first glooms up. build them on rows 2 and 4 with pumpkins to protect them. spam sunflowers instead of sun shrooms once you’re consistently over 100 sun. clear the graves and make sure that no more can spawn in the middle of the lawn by having other plants there. doom the final wave.
for flags 3-4, focus on repeaters/gatling peas more than glooms, but make sure that if it’s possible you also get up your remaining glooms. if it looks like your glooms are going to get crushed at any point, take spikeweed instead. spikerock is not needed on this level as there are no zombonis.
for flags 5 onwards, keep focusing on your gatlings. if you get gargs then you can place pumpkins on column 3 to protect your plants from the imps. gargs don’t spawn in the top row for some reason.
it’s very possible to beat this entire level without gatling by instead using repeaters and going far more aggressive with them. that’s why i suggest putting this level first.
Survival: Fog (Hard)
for the first flag, take the selected plants. if you’re not confident in your ability to quickly deal with pool zombies then you can take the sea-shroom over the sunflower, i would highly advise that you don’t though.
the idea with this level is to build column 8 glooms on the lawn before flag 3 since we do not have enough seed slots to take pumpkin without losing too much time. we will then plant all other glooms on column 9. to start off, use puff shrooms until you can afford the first gloom and then focus on glooms. start with the lawn glooms first. if you’re worried that coneheads may eat your glooms you can stall them with puff shrooms and even defend them with fume shrooms.
for flags 3-4, get up the pool glooms first and then start planting the rest of the ones on the lawn on column 9, defended with pumpkins. you should also make sure you’re putting up gatlings quickly.
if you see a dolphin spawn on flags 3-4, you can deal with them either by taking tall-nut and placing it in column 7 in the pool or by using gatling and torchwood in the pool as shown in the setup. you should look to get them set up there anyway.
for flags 5 onwards, keep on building gatlings and make sure to keep everything defended. gargs should be easier to deal with on this level.
Survival: Day (Hard)
for the first flag, your sunflowers should be planted in every empty space on the lawn. column 9 should have 3-4 glooms (starting with rows 2 and 4) and then column 8 should have magnets. you will likely only need at least 3.
for flags 3-4, you want to start planting gatlings and torchwoods. don’t take gloom stuff as you won’t need it for the rest of the level, just focus on firepeas.
once you get to flag 5 onwards, your gatlings should be able to easily deal with everything that comes up. if your glooms get destroyed then replace them with spikerocks. if gargs spawn, use pumpkins on column 3 to protect your plants.
this level is very straightforward and pretty easy, you should be able to get a 16-minute time easily.
Survival: Pool (Hard)
make sure to buy the rake.
for the first flag, take the selected plants and build up all your sunflowers on the top-half as your first gloom should be on column 9 row 2.use the squash to deal with stray zombies and/or coneheads so you can progress through the level faster. build your 2nd gloom in row 5, get up at least 2 magnet-shrooms to deal with any bucketheads and then doom the final wave. like the rest of the survivals, do not stop planting sunflowers for this first couple of flags and if you feel like sun-production is low then take sunflower in future flags.
for flags 3 onwards, your priority should be getting up all of your gloom-shrooms and gatling peas, only worrying about magnets if the zombie spawns call for it. don’t expect to get all these gatling peas up, but try to plant as many as you can.
if zombonis/catapult zombies spawn, replace the glooms with spikerocks, but if you can re-establish your glooms afterwards then do that.
for dealing with gargs, you should have so much firepower that they get taken out pretty quickly. you can plant repeaters in column 1 to deal with imps. if you get absolutely swarmed with gargs or it’s wave 9 of the flag then you can use an instant like the cherry or squash.
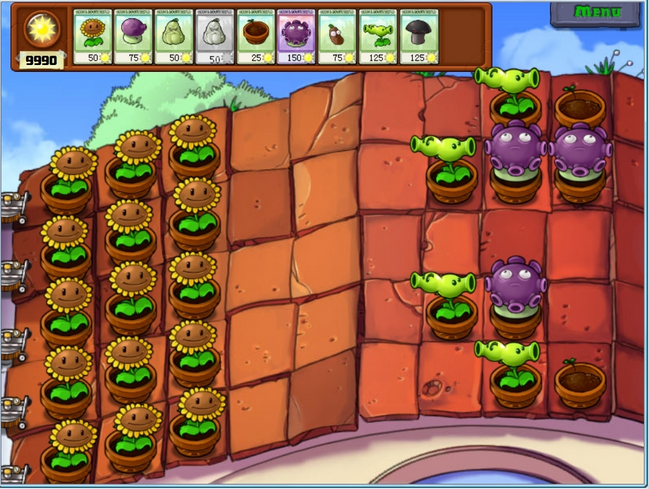
Survival: Roof (Hard)
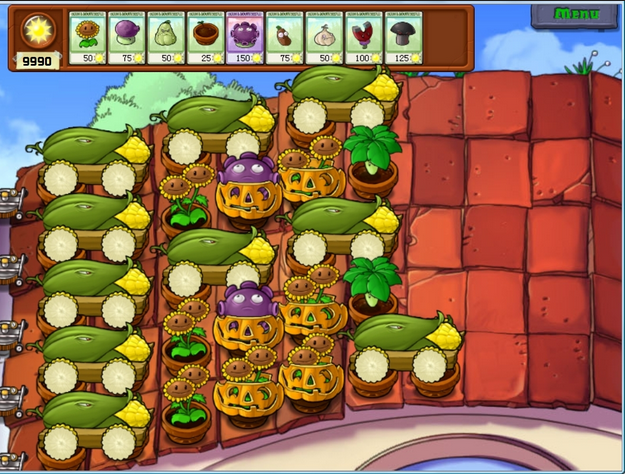
for roof, the safest strat involves cob cannons. all other strategies that involve gatlings or melon-pults are either too slow or far too unsafe to do in a run. cob cannon strats require good timing and can be hard at first, so i highly recommend extensively practising this level if you’re unfamiliar with it.
select these plants for the first flag. your objective for flag 1 is to primarily gather sun for your cobs later on. your glooms should be placed on column 8 to mitigate the risk of catapult zombies ruining your setup. use garlic to redirect zombies on rows 1 and 5 to your glooms (remember to keep future enabled!)
for flags 3-4, you must take the kernel pult, cob cannon, umbrella leaf, doom and sunflower/twin sunflower. you can also choose to take gloom stuff if you want to try and maintain them while you build up cobs and i’d also recommend the pumpkin, but you don’t need it immediately.
when it comes to building up your cobs, starting with cobs at the back is safer, but you’ll be digging up sunflowers which will slow down your sun production. if you plant your cobs at the front you may risk them getting eaten, so pick your poison. for the first row you can actually plant 3 cobs there because gargantuars don’t spawn at the top.
umbrella leaves must be planted quickly to protect rows 5-7 as that’s where your cobs will be, if any zombies land there on the final wave you will risk losing those cobs.
only plant the gloom shrooms at the back if you’re expecting gargantuars, this helps deal with imps.
timing for the cobs is very precise and somewhat hard to master, but what i do is i fire 1 cob in either row 2 or 5 and then wait 3 seconds after it lands before i fire the next cob. 6 cob cannons can safely deal with most waves, but 8-10 cobs is optimal as it can deal with gargantuars. if your cobs are on cooldown use a doom shroom to deal with the current wave (imitator doom shroom is a great thing to have on hand)
this strategy is hard, i’ll reiterate: practise this until you’re comfortable with it.
Survival: Roof (Hard) with Tall-Nut
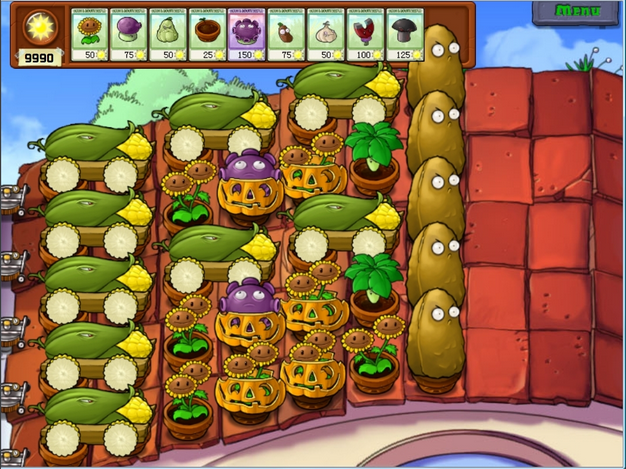
i’ve seen some players really struggle with this level due to pogo zombies getting through and essentially killing the run for them. a solution to this would be to use tall-nuts on either column 7 or column 8 to stop them from getting through completely. one issue is that they can still be crushed by zombonis and gargs and/or exploded by jacks, but they will completely stop pogos and pole-vaulters entirely while also giving you some time for your cobs to recharge.
if you do want to do this, only bring tall-nuts on the waves where you get pogos as otherwise they’re redundant.
End
after completing survival: roof (hard) you will have completed 100%! give yourself a pat on the back for completing this challenging run.
as an aside, while the strats for each particular level are more or less “set”, the actual route itself is quite flexible so do things in whatever order you think works best for you. this is the route i take and that i recommend for people wanting to get into this category.
hope this was helpful, if you have any questions then feel free to reach out in the community discord server! have fun and good luck with your runs!